Share
Pin
Tweet
Send
Share
Send

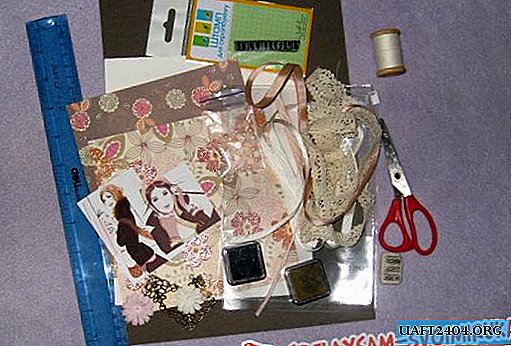
To make such an ornament, we need:
1) Colored paper most suitable for quilling.
2) Scissors, glue;
3) Tweezers, adhesive tape;
4) The rod from the handle.

First we will make a blue snowflake. Cut paper into strips for it and, if desired, using the rod, twist the circles with a spiral. We make five such figures:

Now we twist as many other figures called "horns". Here are these:

We glue the strip lying next to the "horns" in the photo, folding it in two. And we make five of the same stripes. We put the spiral circles into oblong rhombuses and glue together all the composed figures, oppressing them with thin tweezers. We get the following figure:

Cut new strips of paper for her:

We make five special shapes from them, called the "oak leaf": fold each strip five times, and glue their ends together, as shown in the photo below:


Using a needle, open the figure:

Next, we make five tight round figures and five figures in the form of drops, after which we glue them to a snowflake. Such a figure would have to turn out:

And then the snowflake can be supplemented with new patterns. We got such a figure:

Now we make a flower. Cut the colored stripes:

By twisting and gluing them together, we form seven tight round figures and six large ones, after which we glue them together. This is the finished flower whisk:

Twisting a long strip of green with the help of a rod, we form a stalk for our flower, and on the sides we glue leaf figures. We attach the resulting stalk to the corolla of the flower and our flower is ready:

Now make a yellow butterfly. First, cut out two strips of black colored paper and twist them in a spiral using a rod, glueing in some sections along the length of the inner side each strip so that the curl holds tightly:

Now we glue them together and glue the antennae:

Then, from the stripes of yellow paper, we will make wings, that is, so far only their “walls”, which can be filled with beautiful patterned figures.

The first decoration of the wings were figures called the "oak leaf", which we made by making a snowflake. After them, glue small round curls to the lower sides of the wings and make double figures from patterns of white and yellow paper, and then glue them:

We twist two yellow and two white strips of paper in a spiral and glue them. We give the yellow round curls the shape of drops and glue on the lower side of the large wings, and on the upper side white curls:

Next, glue two small yellow curls to the very upper sides of the wings and prepare eight other, incomplete, and different sizes:

Glue them up to the same yellow curls and to hold each pattern, you should stick it to a figure located close to it (The size and length of the curls are calculated in advance). Then we roll ten white tight balls of small size in order to decorate the underside of the wings, and also glue them:

For all the time we worked with the butterfly figure, we corrected the length of the walls of the wings many times, which constantly changed as more and more patterns were added to them. For the upper sides we roll sixteen tight curls and, gluing them together, attach to the wings; after that we make a leg - we roll up a strip of black paper and glue it:

That's it - our butterfly figure is ready. Now you can create two snowflakes using the same technique, a red flower, a brown butterfly, a green figure and an orange flower:

Having created nine figures, we finish work on jewelry and begin work on a garland that will hold them. Figures can either be tied with thread to it, or glued with tape. We take a small sheet of paper in A4 size, bend it across and glue the transverse ends:


You need to bend the sheet four times:

Draw two lines along the top and bottom, with a slight indentation:

Now draw the transverse lines, leaving the same distance between them. They must take turns passing through the upper, then through the lower lines along:

Erase the entire drawing with an eraser, leaving barely visible traces and cut it with scissors along the transverse contours, first on one side:

And then on the other:

We lay out the sheet:

Now, using a long thin brush (or knitting needle), open the sheet and give it a rounded tube shape:

We make the second the same tube:

We glue them with tape and, stretching, glue the garland in a prominent place:

We attach to it all our decorations and everything, - our Christmas decoration is ready:


Sincerely, Vorobyov Dinara.
Share
Pin
Tweet
Send
Share
Send