Share
Pin
Tweet
Send
Share
Send
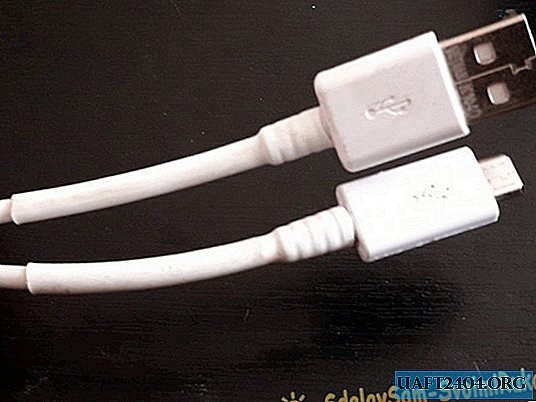
A good cable, with a good, durable plug for charging your phone in the store is extremely difficult. Often, the quality of the goods declared on the packaging does not correspond to reality. If the micro usb plug itself, which connects to the connector of your phone or other gadget, is made of low-quality steel, it will loosen very soon, or will bend, and will loosen up in the connector, thereby causing failures when charging the battery. Or it will stop transmitting and receiving files from other devices, for example, from a computer or flash drive. And it’s very unpleasant when the cable you have with a good plug suddenly stops working because of a broken cable core, near this plug itself. This happens due to permanent cable bends when used. When this happens is a matter of time. Depending on the intensity of use. You can go and buy a new one, or you can repair the old one - this is each individual matter. Personally, I prefer the second option. Not so much because of the bustle of choice and walking around communication salons, but for my own interest. Yes, and, again, I will not have to spend money ... In general, a daughter recently brought me such a faulty cable. I don’t know what she did to him, but he was damaged at the bases of both plugs at once - usb, and micro usb.

I took up this matter, also because this cable was "native" from her phone, which came complete with a phone, charging, and headphones. She categorically refused to use another, for fear of ruining the phone. And she didn’t want to buy the original cable either. I had to give her my own (good, we have the same phones), and repair a broken one for myself. Work took me about an hour.
Will need
- Soldering iron, tin and flux.
- Scissors.
- Clerical knife.
- Seconds glue.
- Shrink tube (preferably matching the color of the cable).
- Lighter.
- Little nippers.

Cable repair
To begin with, without ceremony, we cut off the damaged plug from the cable. In my case, both plugs.

Next, using a clerical knife, cut the plug along the seam. My plug cases were welded along the seam, so I had to tinker. But there are plugs with a collapsible case - here someone is lucky. Nevertheless, having drawn several times with a new clerical knife blade at the seams of the case, I separated it quite easily and quickly. Having removed the case, we disassemble the plug into its component parts.


Here you need to be careful. In terms of plug contacts: which wire is soldered to which one. In order not to get confused, you can mark the contacts with multi-colored markers, in the color of the wires. I don’t need it, I have long known the usb layout by heart ... Just in case:

Now let's deal with the cable. We measure from the edge the distance in the length of the rubber seal, and also add here the length to the contacts of the plug. Cut the braid from the cable according to the calculated length.

We put a rubber seal on the wires, solder the colored wires to the corresponding contacts and insert the block with the contacts into the metal plug.

After making sure that everything is in place, nothing sticks out anywhere, we glue the plastic case to the plug with second glue. We carefully monitor that the glue does not get on the contacts of the plug.

Next, we put a heat shrink tube on the cable (from the other end), and seat it with a lighter. One more note: if you are repairing only one plug, make sure that the heat pipe is put on the cable before you solder the plug to the cable and glue the case, otherwise then, you will have to disassemble everything again to fix this oversight. After shrinkage, the tube will tightly clasp the cable along with the rubber seal; you get an almost monolithic braid, as before.


Now the second plug is micro usb. We pass the heat pipe on the cable in advance, so as not to forget later. We disassemble the plug. Just like the previous one: with the help of a clerical knife.

Here the design turned out to be even simpler than that of the usb plug - the wires simply stick into the top of the plug directly in its braid, and when connected to the bottom of the plug, this braid is pierced by the notches on the contacts located on the bottom of the plug. The main thing here is not to confuse the layout of colored wiring.

Next, we assemble the plug together, like the previous one.

We put on the broken braid of the cable thermotube, which we previously put on the cable. We sit down the phone.

That's all - the broken cable is back in operation, with the same functions for which it was intended by the instruction. And without any external and visible violations of the braid, such as wound electrical tape. It looks like new. We connect to the phone and use it with pleasure!

Share
Pin
Tweet
Send
Share
Send