In the manufacture of various home-made products in a home workshop, an ordinary electric drill or, for example, a screwdriver is far from always able to cope with the task assigned to them.

In particular, this concerns the drilling of precise holes in small parts and workpieces made of wood or metal. When carrying out such "delicate" work, a semi-automatic drilling machine that can be made by yourself is useful.
As the main material, plywood or MDF is suitable. The first step is to make a base for the drilling machine. For this, the master cuts out a piece of MDF of the right size. From below, he glues legs made from pieces of plastic pipe.

Step-by-step drilling machine manufacturing process
Next, it will be necessary to saw blanks from MDF, from which the master glues the bottom of the vertical stand of the drilling machine. Superglue is used to connect all the parts.

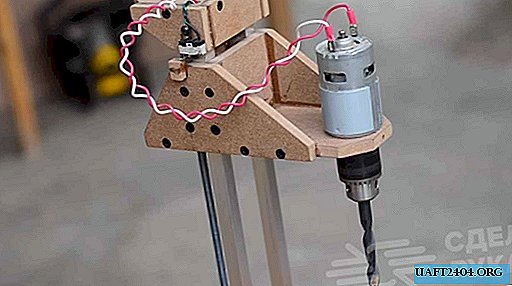
Inside the resulting duct, a stepper motor is installed. To fix it in the "landing slot", the master uses screws.

Two profile pipes made of aluminum are used as guides of the vertical posts - they are also fixed with screws that tighten on the sides of the lower box.

At the next stage, the movable part of the drilling machine is made, to which the electric motor is fastened at 12 V. A chuck will be mounted on the motor shaft.

Then it remains only to make another part from MDF, which is mounted in the upper part of the rack, and connect the motors to the control board and power source.
For more information on how to make a semi-automatic drilling machine for a workshop with your own hands, we recommend watching this video.