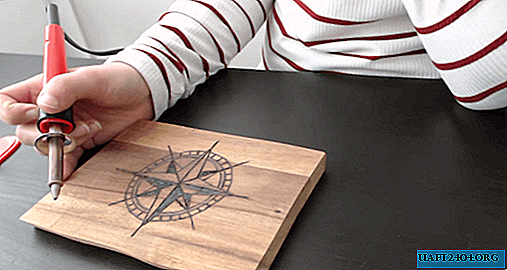
Pyrography (the art of burning or "drawing with fire" on wood) is a separate direction in art graphics. This is a special philosophy of creativity in the field of arts and crafts. She has an interesting story and her own secrets. To create a beautiful drawing, you need a wooden board, an electric burner (pyrograph) and a little imagination.

Using the device for burning wood, you can draw unique relief and smooth ornaments on blanks of plywood, as well as other improvised materials: leather, plastic and even paper. The process of "drawing by fire" on a tree gives an indescribable pleasure. In addition, fine motor skills, attentiveness and perseverance develop. With some experience, you can burn drawings in the form of a large picture, which will become real masterpieces of art, taking pride of place in the home collection.
What is a burning device
From the point of view of electronics, the circuitry of an electrical device for drawing on a wooden surface is quite primitive. The basis is a step-down transformer generating a voltage of 6-12 V. Also, the burning device consists of an ergonomic handle with a pin and an electric cord. Depending on the design, the transformer is located in the handle or in a separate unit. In the latter case, it is a professional apparatus for drawing. For children under 10-12 years of age, such a device can be difficult to learn.

There are models of wood burners with interchangeable nozzles and a tip. They differ in operating features and other nuances, which will be discussed below. Depending on the wood, the burning tool will behave differently. For experimental work, masters in the field of pyrography recommend using a piece of ordinary polished plywood. For a child who is learning to burn, this is an ideal preparation. If you plan to create patterns or volumetric paintings, light planks of birch and linden are suitable. But pine harvesting is better not to use.
A little bit about the history of creation

The history of drawings on a wooden surface has more than one millennium. The first finds in the form of scorched ornaments and patterns on wooden products were household items and household utensils, which were discovered by archaeologists during a scientific expedition to Peru. Their appearance dates back to 700 BC. Later, pyrography originated in Egypt and penetrated the culture of Asian states. For burning wood, thin metal pins that glowed in hot coals were used.
In Europe and on the territory of Russia, pyrography was seriously carried away in the 9th century. This direction in the fine arts actively developed until the beginning of the 19th century. For the first time in the Russian Empire, they began mass production of various toys from wood (nesting dolls, cars, etc.) with neatly scorched drawings on the surface. In the middle of the 20th century, a burning apparatus was invented, which was called a pyrograph. From that moment, applied art flowed smoothly into folk art.

The technique of creating a drawing burned by a soldering iron began to be taught at school at labor lessons, and in the heyday of the USSR, pyrography became a massive youth hobby. The guys who did not have an electric appliance improved their skills in burning out the sun with a lens (magnifying glass) - working on products took longer, but it was possible to create bitmaps right on the street. In the 21st century, pyrography is an interesting hobby for children and adults, which does not require special skills. The most important thing is desire.
Types of burners: features, advantages and disadvantages
To select a device for burning wood, first you need to decide what types are available today. Conventionally, they can be classified into professional and simple electrical appliances. The most common are considered models of devices for burning out like a soldering iron, the working element of which is a replaceable nozzle made of refractory metal. Brass tips are commonly used. When working with solid wood species, the heating must be directed, and for this, burners with a thick sting are most suitable.

Professional devices include a device for burning the lapel type. In these portable mini-stations, a nichrome wire, which has the shape of a loop, is used as a working tool. Depending on the thickness and glow of the wire, the lines on the surface of the tree have a different mark. For example, thicker loops allow you to create bold strokes and patterns, while thin ones are used to stroke the outline of the picture. Usually, spare needles for the device are provided in the kit, which you can give the desired shape with pliers. Let us consider in more detail each type of apparatus for burning wood.
Feather Pyrograph
Electrical appliances with wire pins are suitable for more experienced people. Using the temperature control unit (smooth or step), you can easily set the temperature of the wire. At the same time, the nichrome loop itself heats up and cools for 15-20 seconds. With such a pen, the device makes it possible to draw complex artistic subjects on wood. For simple graphic images, it will also work. If the wire burns out (this occurs with prolonged use), then it is easy to change it. On sale, the wire is presented in different thicknesses. In terms of safety, electric hinges with loops are more suitable for children than pyrographs like a soldering iron.
Solid Pen Pyrograph
Externally, the tool is similar to a classic electric soldering iron, but differs in a more convenient form and a lightweight handle. This device allows you to perform the most basic actions in the process of burning, and due to the presence of interchangeable nozzles, you can get a different mark on the surface of the tree. Ideal for creating medium to large designs.

Heating and cooling the brass tip (pen) takes a little longer, compared to the lapel type electric burners. To prepare the device for operation, it will take at least 5 minutes. Changing nozzles is possible only after complete cooling down - on average, it takes 10 minutes. Together with the burner, a kit with different pins is provided in the kit. The disadvantage is the lack of a power regulator.
Depending on the model, the metal nozzle can "dock" in different ways with the heating element - screw in or out. Some devices of the soldering iron type have an additional button on the handle with the lock, when pressed, the power increases by 2 times. It can be used for short-term work.
Related tools and accessories
A burning device is the basis of pyrography, but without special tools it will not be possible to perfectly master this art. In addition to the burner itself, the set includes interchangeable brass tips that allow you to create original patterns. The more nozzles, the more opportunities there will be for the implementation of various drawing techniques. It is also important that a spare needle is included. Little fans of pyrography will not be amiss to buy a music stand board, which is convenient to work on. If desired, a soldering iron or lapel-type device for burning on wood can be made with your own hands using an old transformer or power supply.
# 1 Choosing a pattern for burning and ways to transfer it to a wooden surface

Pyrography is quite simple and interesting. This hobby is ideal for children and adults. It is only necessary to master the basic techniques and skills of "drawing by fire", and to choose the right patterns for burning on wood. Professional pyrographs rarely copy the work of other authors, and draw on their own. But what about the beginners in this business? Original and light drawing schemes can be found on the Internet on various thematic sites devoted to wood burning without problems.
(Further… )
submitted by  Anton 22.12.2017, 20:05
- Report
# 2 What you need to know for your first pyrography, step by step instructions

Burning wood is incredibly interesting - this is a popular home hobby for people of different age categories. Experienced pyrographists paint exclusive paintings and create incredible masterpieces. Children are happy to learn to burn geometric shapes and various animals on wood. The burning technology itself has been known for a long time and is quite simple, however, beginners in this matter will have to show a little patience and perseverance in order to understand the basic principles of working with an electric burner, as well as learn the available methods of applying an ornament or image to a wooden blank.
Wood burning for beginners begins with the development of basic practical skills and theory, which also includes safety rules when working with a pyrograph (especially for children). Before embarking on creativity, it is necessary to properly prepare the workplace and stock up on additional materials. Consider the most important points in the burning process that every pyrographist must know.
(Further… )
submitted by  Anton 26.12.2017, 21:29
- Report
# 3 Complex pyrographic work, various techniques

The art of "drawing by fire" or simply burning wood appeared long before the invention of the first gas burners and the advent of electricity. For the decorative design of wooden products, various tools and techniques were used. The most primitive method is a metal pin with a pointed end, which glowed red in hot coals.
Over time, burning devices improved and became more practical. And today, fans of this type of creativity can use professional tools for drawing on wood - electric pyrographs with interchangeable brass nozzles or a loop of nichrome wire. However, in order to learn how to burn complex drawings, you will need to study the theoretical foundations of pyrography.
(Further… )
submitted by  Anton 30.12.2017, 11:33
- Report
# 4 How to make a simple burner yourself from improvised materials

Today, pyrography (the art of wood burning) is gaining more and more popularity among fans of non-standard ideas of home creativity. And there is a simple explanation for this - with the help of a compact electric device, you can burn not only patterns and primitive drawings, but whole pictures that are quite worthy to become masterpieces of art.
Portable household electric type pyrograph with interchangeable brass nozzles or a "loop" of nichrome wire allows you to burn on different materials: wood, plywood, leather and cardboard. There are many models of burners on the market, but many of them do not suit either price or quality. Therefore, more and more people prefer to make a wood burner with their own hands. There is nothing complicated here, the main thing is to remember the main points and correctly approach this issue.
(Further… )
submitted by  Anton 31.12.2017, 17:36
- Report
# 5 Different stencils for burning, from simple to complex

To learn how to burn beautiful pictures on a tree worthy of becoming masterpieces of home creativity, you need not only a professional tool (electric pyrograph), but also perseverance and a little imagination. The basis of any scorched drawing are sketches, diagrams or templates, according to which further work is carried out. You can make sketches in many ways.
Experienced pyrographists prefer to draw blanks on their own - they have a good eye on this matter. However, it is easier for beginners to use special stencils for burning wood for practical exercises. You can find them on the Internet. It remains only to download and print on the printer. In addition to the stencil itself, you will also need carbon paper and a pencil (or pen).
(Further… )
submitted by  Anton 07.01.2018, 00:00
- Report
Add entry
Picture Video Audio Text Insert code

